Last month Kinsta enabled their new Cloudflare integration. I’ve been looking forward to this release as it opens up many opportunities for improved hosting services. I’m currently rolling out the new integration to all Anchor Hosting customers. If DNS is managed by Anchor Hosting then no action is needed. Otherwise you can expect an email with some instructions as a DNS update is required sometime over the next few months.
This will be a summary of what I’ve learned so far along with a few recommendations to make sure the switchover happens smoothly. The main thing to look out for is conflicting Cloudflare accounts before activating the new Cloudflare features. Otherwise you risk running into internal Cloudflare issues. Let’s dig in.
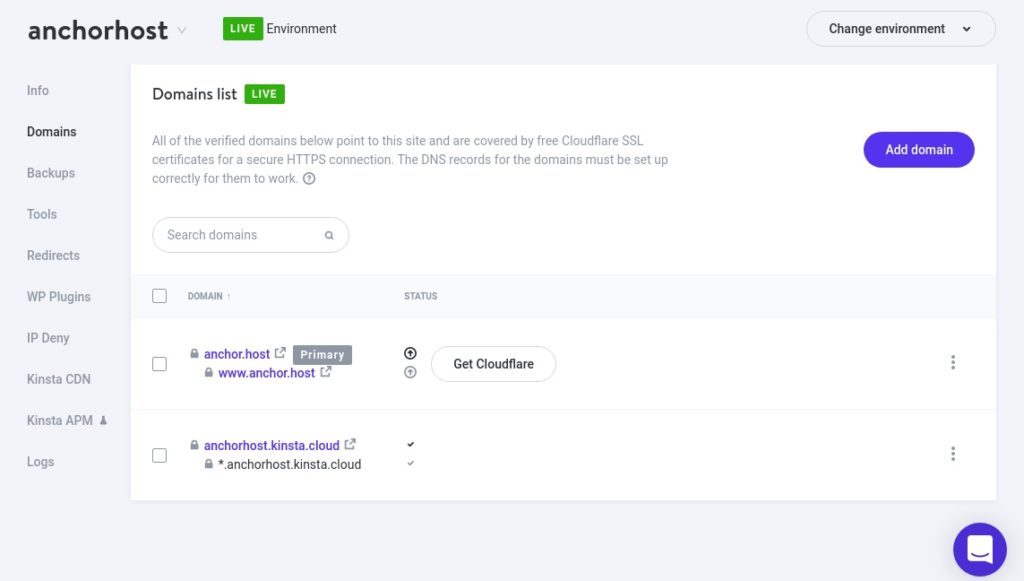
Required DNS updates for all Kinsta sites.
Beside a few edge cases, the process to activate Kinsta’s Cloudflare integration is quite simple. You press the “Get Cloudflare” button under domains and follow DNS instructions. If it’s a site which is already setup using Let’s Encrypt then it will skip the verification step. For new domains there will be extra TXT dns records required in order to verify the domain which will pre-install a Cloudflare SSL cert.

While this might seem like extra work compared to previous Let’s Encrypt method it has one huge advantage. You can now install an SSL certificate before pointing over DNS. That amazing! No more running into SSL issues on launch day waiting for DNS to propagate.
Detecting conflicting Cloudflare accounts before activating Kinsta’s Cloudflare integration.
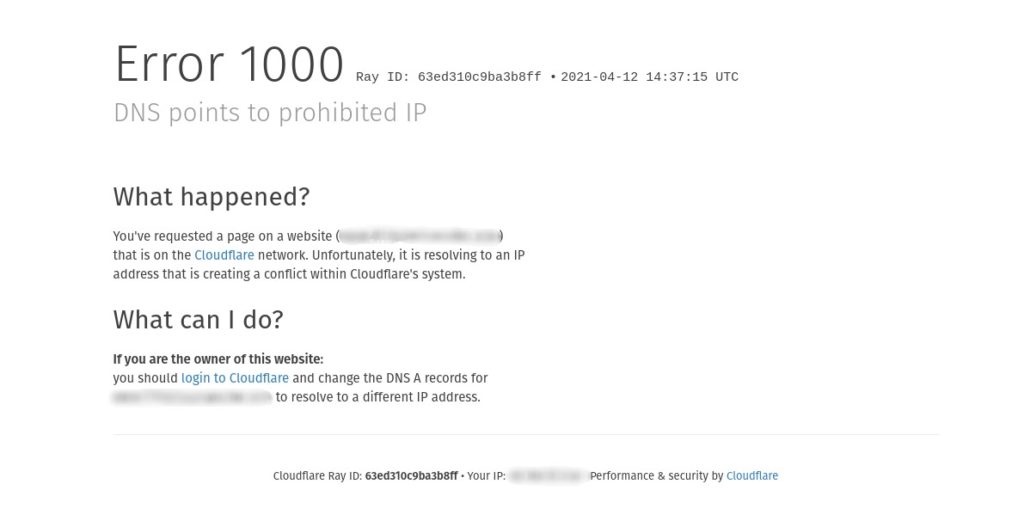
Once you press the “Get Cloudflare” button there is no going back. Kinsta interface changes from the old Let’s Encrypt configurations over to the new Cloudflare SSL setup. This is annoying if run into an edge case with Cloudflare requiring extra support with both Kinsta and Cloudflare in order to resolve. A conflicting Cloudflare IP happens when your domain happens to live in another inactivate Cloudflare account. To avoid we can query DNS against Cloudflare to hunt for conflicting IPs.
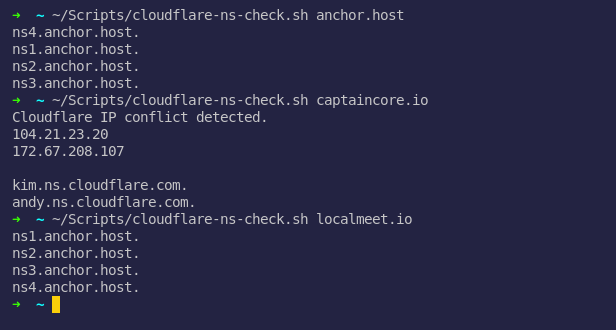
The following cloudflare-ns-check.sh bash script will take in a domain and report a conflict.
!/usr/bin/env bash
domain=$1
domain=${domain/www./}
check=$( dig @ns.cloudflare.com $domain +short )
if [[ "$check" != "" ]]; then
     echo "Cloudflare IP conflict detected."
     echo -e "$check"
     echo ""
fi
dig $domain ns +short
Here is what it looks like to run. If it’s healthy it will return the current nameserver, which is also helpful to know if you control DNS before activating Cloudflare. Without DNS access then you won’t be able to complete the necessary DNS updates.
Resolving Cloudflare conflicts when found.
If you have access to the domain provider you might be able to resolve the conflict yourself by doing the following:
- Add domain to a free Cloudflare which involves point nameservers over to Cloudflare.
- Point nameservers back to your domain provider or whoever you use for DNS.
- Delete the domain from Cloudflare.
- Check with
cloudflare-ns-check.shto see if the conflict is resolved.
If that doesn’t resolve the conflict then I recommend creating a support ticket with Cloudflare and ask them to remove the conflicting Cloudflare IP. I’d sent them a screenshot of what your seeing when running dig @ns.cloudflare.com <domain> +short. They should be able to verify you own the domain and remove the bad IPs out of there system.