
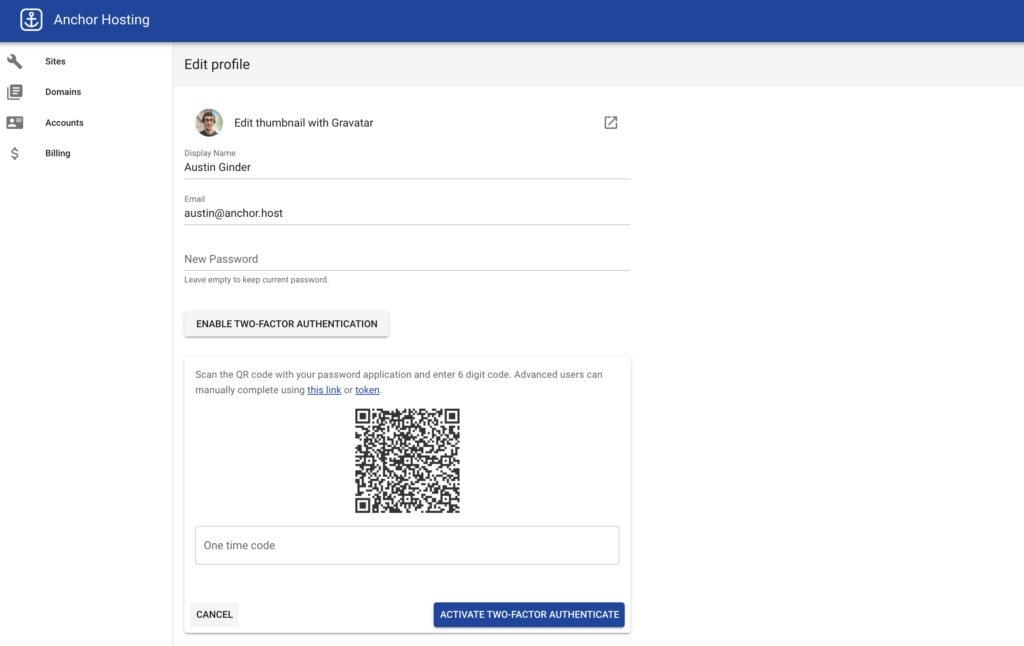
Recently I had a customer ask for a two-factor authentication option for Anchor Hosting. That’s now been added and is ready to use. Customers can sign into the Anchor Hosting portal and activate 2FA from their profile page as shown here.
Building 2FA using PHP and Javascript.
If you’re a developer or just curious about more technical information then read on. With WordPress, there are many 2FA WordPress plugins and 3rd party solutions. While the Anchor Hosting panel is powered by WordPress it’s also a custom template created with Vue.js and not directly compatible with other WordPress plugins. That has many advantages however does limit my ability to use an off-the-shelf WordPress plugin solution.
After doing a bit of research I decided to build 2FA using a PHP library called OTPHP and kjua.js. OTPHP handles generating unique tokens and validates one-time passwords while Kjua handles drawing the activation barcode. Many of the other solutions I found were either overly complex or sent data to a 3rd party provider, which is not ideal.
Two Factor Authentication is fairly straightforward.
The idea behind TFA with one-time passwords isn’t that complicated. Each customer generates a unique token that can be used to generate other one-time verification passwords which expire every 30 seconds. This unique token is typically shown as a bar code that can be scanned into password management applications like 1Password which handles generating time-sensitive passwords.
So what does that look like in terms of PHP code? Well OTPHP makes it super simple. Just a few lines of code to activate and a few lines to verify one-time passwords. Since this is a WordPress site we can store the 2FA along site the user account as meta fields. For my example, that will be myappname_2fa_token and myappname_2fa_enabled.
// Generating a unique token when activating 2FA per user.
public function tfa_activate() {
    $user    = wp_get_current_user();
    $otp     = \OTPHP\TOTP::generate();
    $token   = $otp->getSecret();
    $otp->setIssuer( 'Anchor Hosting' );
    $otp->setLabel( $user->user_email );
    update_user_meta( $user->ID , 'myappname_2fa_token', $token );
    return $otp->getProvisioningUri();
}

// First time validate. If valid then mark the customer to use 2FA.
public function tfa_enable( $token ) {
    $user   = wp_get_current_user();
    $secret = get_user_meta( $user->user_id , 'myappname_2fa_token', true );
    $otp    = \OTPHP\TOTP::createFromSecret($secret);
    $verify = $otp->verify($token);

    if ( $verify ) {
        update_user_meta( $user->user_id , 'myappname_2fa_enabled', true );
    }

    return $verify;
}

// Validate a one time password during login.
public function tfa_verify( $token ) {
    $user   = wp_get_current_user();
    $secret = get_user_meta( $user->ID, 'myappname_2fa_token', true );
    $otp    = \OTPHP\TOTP::createFromSecret($secret);
    return $otp->verify($token);
}
To display the bar code we can pass the provisioning URI from OTPHP into Kjua. With a custom REST endpoint we can retrieve the TFA link and display it within <div id="tfa_qr_code"></div>.
axios.get(
	`/wp-json/myappname/v1/me/tfa_activate`, {
		headers: { 'X-WP-Nonce':this.wp_nonce }
	})
	.then(response => {
		this.profile.tfa_uri = response.data
		let tfa_qr_code = document.getElementById("tfa_qr_code")
		tfa_qr_code.innerHTML = ""
		let qr_code = kjua({
			crisp: false,
			render: 'canvas',
			text: this.profile.tfa_uri,
			size: "150",
		})
		tfa_qr_code.appendChild(qr_code)
	})
Lastly here is the PHP code needed to generate that REST endpoint.
register_rest_route(
	'myappname/v1', '/me/tfa_activate', [
		'methods'       => 'GET',
		'callback'      => function ( WP_REST_Request $request ) {
			return ( new MyAppName\User )->tfa_activate();
		},
		'show_in_index' => false
	]
);
I’m not going to cover a complete solution as how this approach into implemented into other applications will vary greatly depending on your UI. If you’d like to see my full code changes, see here.